Saturday, February 22, 2014

HOMEMADE ARCHERY TARGETS (By J D)

HOME MADE ARCHERY TARGETS


I have no idea why archery targets are so expensive, or bows for that matter. 
A good 3' by 6' target will cost around $600.00, and I wanted two of them, so it was time to look for scraps and research homemade targets. I liked the floor carpet idea. The floor padding seems like it would compress easier, so I used a lot of it. A target that stops a 325 FPS arrow has to be compressed very tight. I started off by making two frames out of 2x12's. The frames have an inside measurement of 3"x6".  When you are finished, take the top off because you are going to over fill the box with carpet about six inches over the top and compress it all together (more details on that below).

Next, I made a plywood pattern to cut the carpet. This is where things went really bad. I tried to cut the carpet in a few days. I sharpened three steak knives, and I changed the blade angles to 30 degrees so they would be like a razor. They cut the carpet really well, but cutting carpet from morning to night is exhausting. When old folks get tired they start making mistakes. The second day I cut off the tip of my right index finger. Two days later, I stabbed my left hand to the bone. Finally, I drove 20 miles to a hardware store and bought a carpet knife. What an invention! The picture below was of the second day, still using steak knives.


 Targets need to be compressed, and I needed enough of these cut outs to fill two 3 feet tall boxes. I actually needed to keep cutting until the pile reached seven feet tall.
This took about two weeks of all my free time. I applied two temporary boards to the front of the target boxes to help keep the carpet flush with the front of the box.

 
 I filled the box about 6 inches above the top, but next time I will fill it higher to make it even more compressed.
Now, put the top back on the box and find some way to compress it down. I used furniture clamps. As you squeeze the carpet down, it will try to bulge out the front. Don't worry about this now, just get the top locked down.


 It takes a lot of adjusting as you tighten one clamp after another, so take it slow. I cut out the top board so it would lock into place and keep the project square. As soon as the joints locked into place, I screwed it down with 4" construction screws.

 Now, you can stop at this point and just hang paper targets on the face and it will work just fine, but I was trying to duplicate the $600.00 target that I originally wanted, so I built a wood frame for the front.
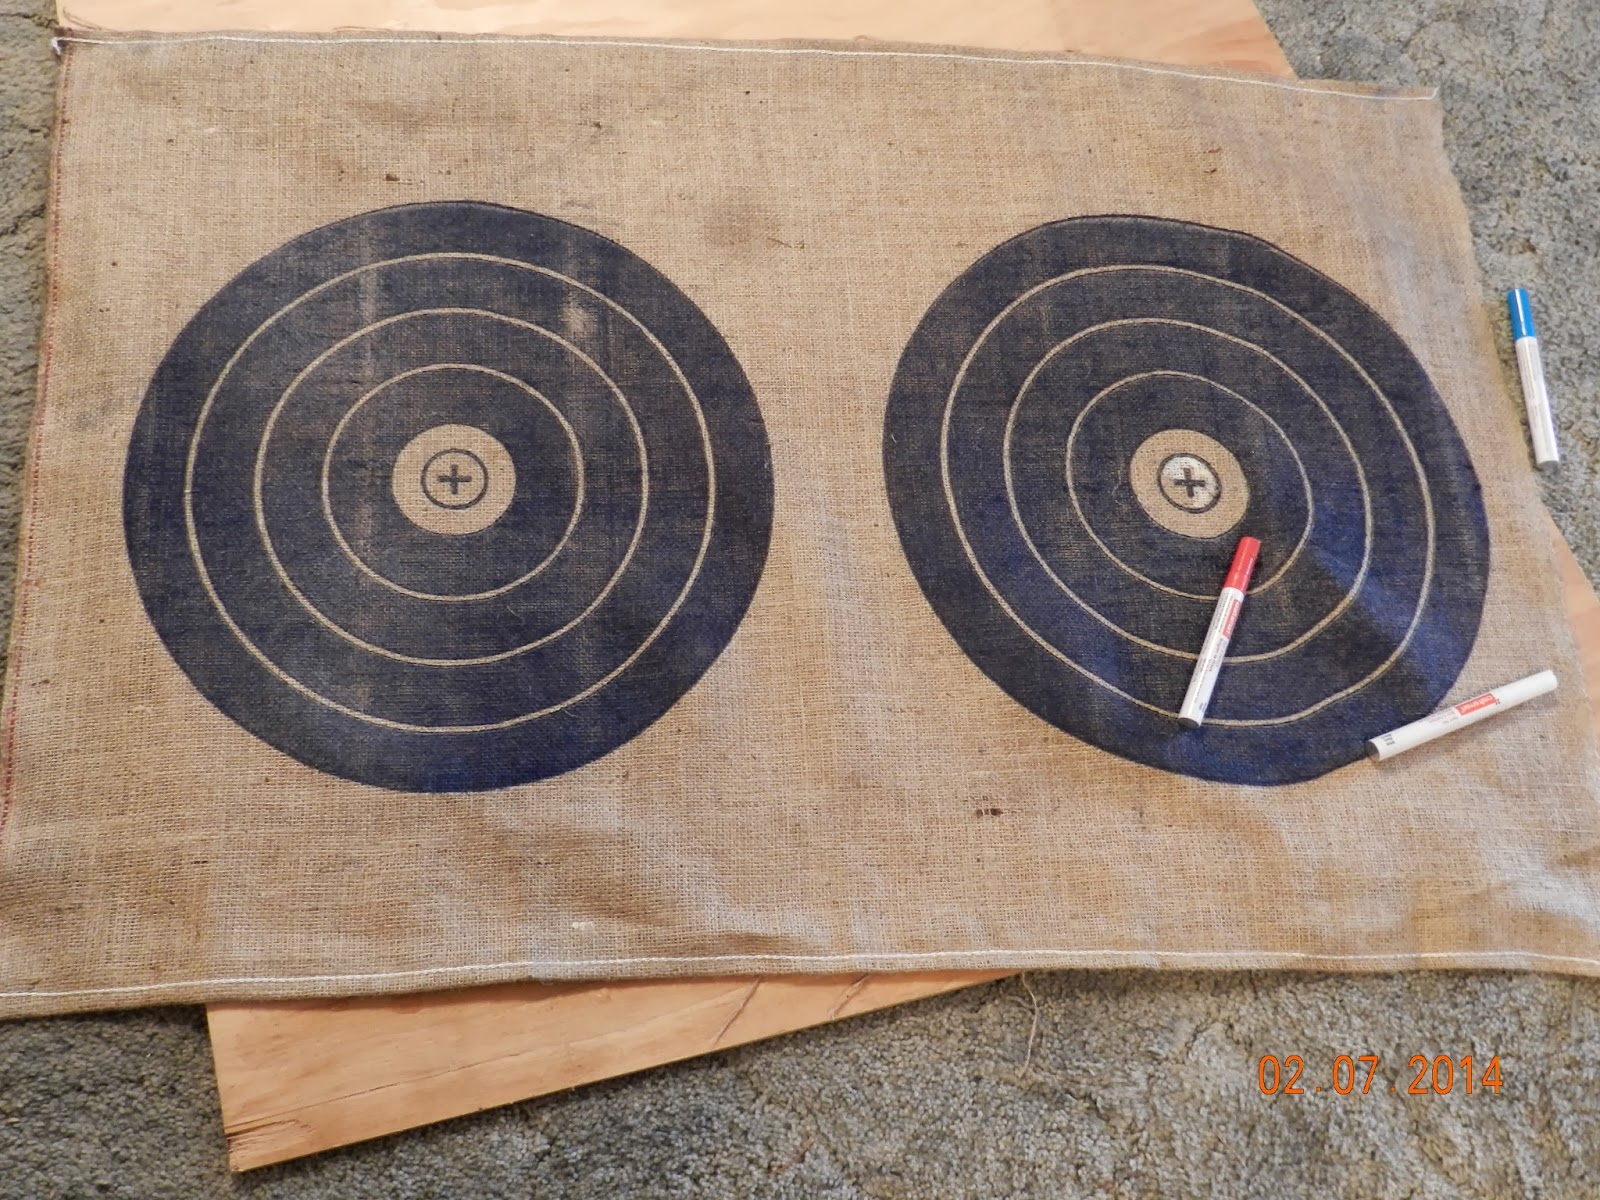
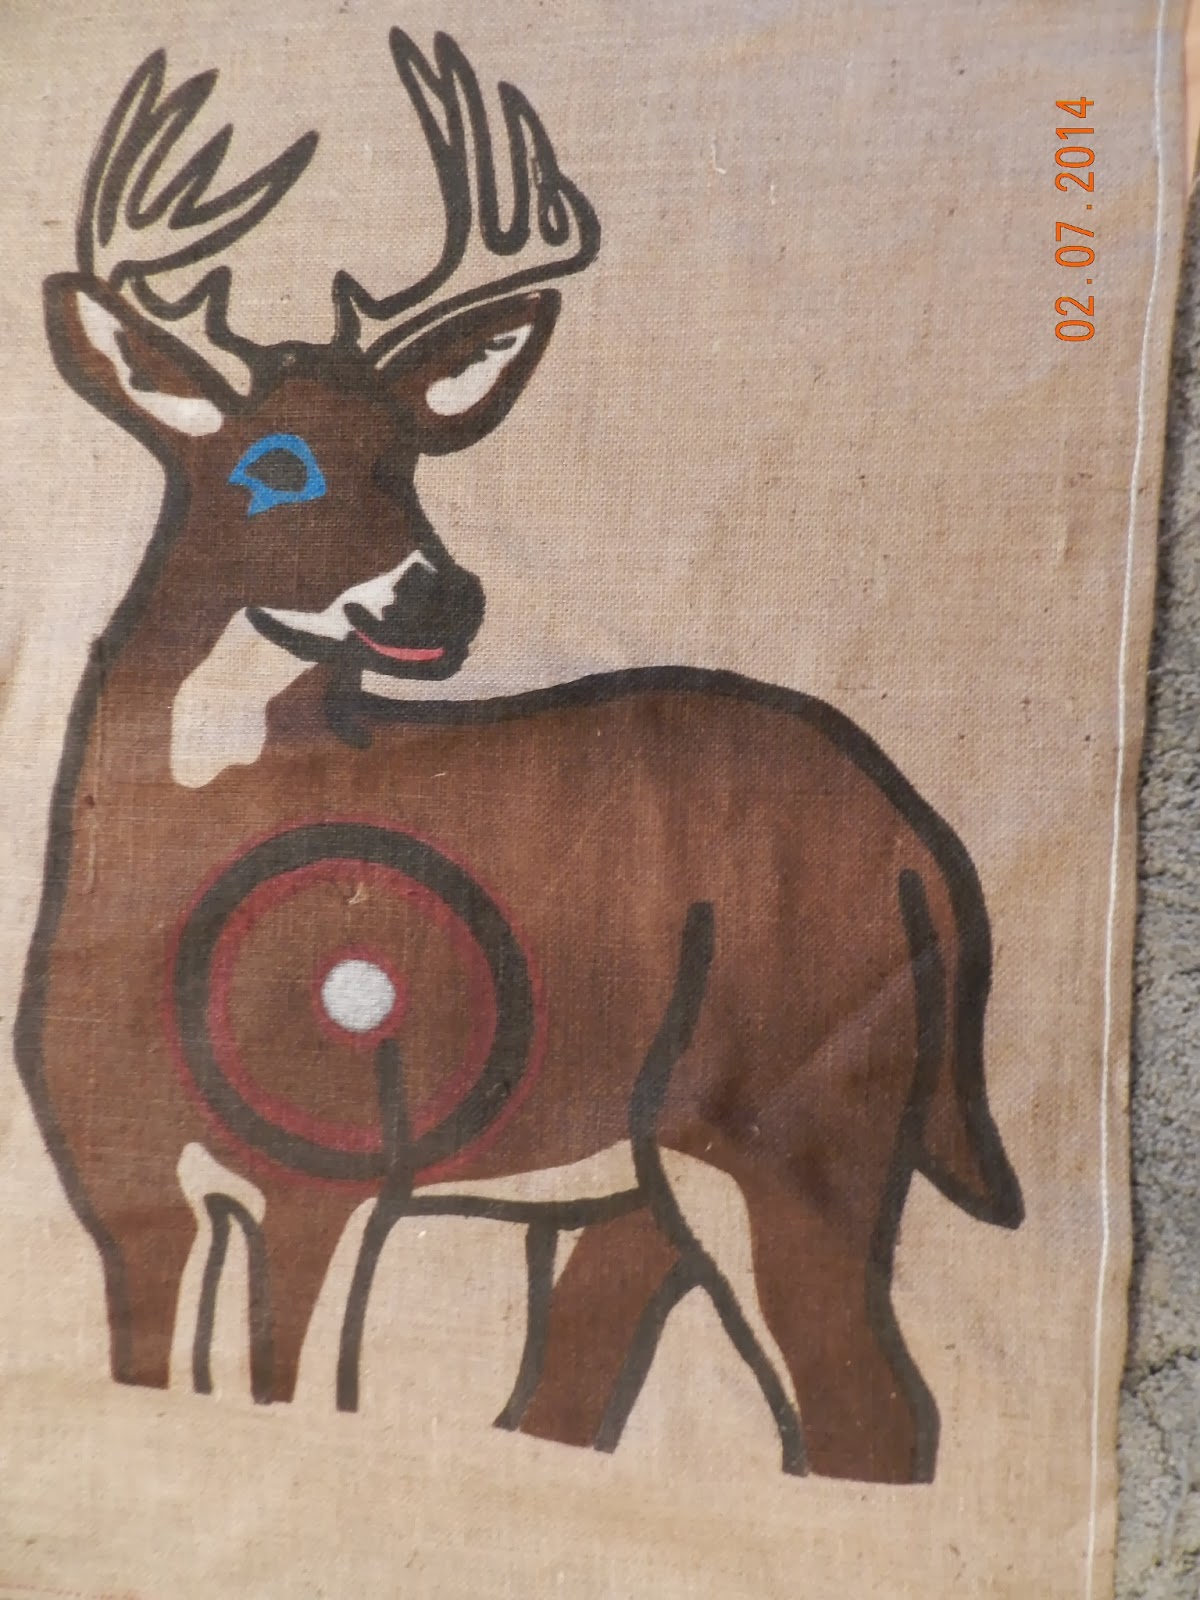
My reasoning was to cover the wood frame with white canvas and sew targets onto the canvas. After it is used for a couple years, all I have to do is replace the canvas with targets in new locations. That way, this target should last several years. I bought two burlap targets from Allan Archery for about $5.00 each. One had a picture of a Deer and the other had two bulls eyes. They were advertised as light blue targets on a white background, but they turned out to be dark blue on brown burlap.
So, back to the store to buy some paint pens. Jean helped color the targets, cut them out and sew them onto the white canvas.

The white canvas was stapled to the wood frame and then screwed onto the target box. These boxes weigh about 200 LBS a piece, so you need some help moving them around. We used pipes under the boxes to roll them out to the archery range. It took a while, but the job got done. I won't even get into how we stacked them on top of each other. That was something I didn't include in my planning of this project. To fill in the extra space in the Deer target, I cut four small targets out of Levi material and colored them in with the paint pins and Jean sewed them on also. It was all sprayed with water proofing to keep it dry and a green tarp (top of targets) was attached to the roof of the building to be rolled down when the target range is not in use.

So, there you have it. $1,200.00 worth of targets for about $30.00 each. Now, if I could just figure out how to make one of those $900.00 bows I could start a new business.

Thursday, August 30, 2012

Making an assembly table


I have built wood projects on the floor of the garage, in the driveway and on plywood sheets on a pair of sawhorses, but I have never owned an assembly table. While planning this out I thought of all the problems I have experienced while putting together a project. I must have walked one-hundred miles over the years just in my garage looking for tools, sandpaper and such. I needed drawers in the table to hold router bits, sandpaper, sanders and finishing products. I have already built a cabinet on rollers that holds all fasteners, thirty different kinds of screws, five different kinds of nails, staple guns, screw guns, pin guns and all my clamps.   I just needed a table to roll that cabinet up to. I told my wife we needed a better chest of drawers in our bedroom. After we bought one, I took the old dresser and started to build a table frame around it. I also wanted a large floor shelf to store large tools. I painted that shelf before I installed it with the same pattern I painted the garage floor with. I then attached an  electrical box so I would have only one extension cord in the garage floor. Remembering how hard it was to hold down a large flat board and try to sand it, or carve it at the same time, I imbedded a four feet T-Track into the top of the table to hold boards flat in place. I bought several different types of hold down attachments for the T-Track. That is most likely the biggest benefit to this table over other work tables. I also inserted the top of the table into a frame so I can easily replace it when it gets too banged up. Add two wood vices and we have an assembly table. 


Wednesday, August 8, 2012

GARAGE REMODEL

Our garage was built in the early 1900's. The cement was made on site and includes everything from sticks to different sizes of rocks. There is no border foundation. The entire floor is only 3" to 4" thick. Over the years, the building has settled and the floor has cracked in several places. The center has cracked 1/2" wide and the center is higher then the corners. Any contractor would have recovered the floor with another 4" of cement and sand, but that would be way too expensive for us. Every recommended floor repair was $600.00+ and none of them were recommended for a floor this damaged.  I decided to keep the project under $300.00. I used various crack fillers and I sanded the floor with a 4" belt sander. The floor was given six coats of bonding sealer, epoxy paint and a clear flaked top coat.

WALLS and CEILING: The entire garage is made of bare rough cut redwood, which I love, but it made the room very dark. I painted the walls and ceiling bright green. This was a three month project. There were 23 broken windows that needed to be replaced. When I removed the glass, some frames fell apart because of wood rot. The frames were rebuilt and sealed with epoxy. All that is left is to call an Electriction to rewire the room.

BEFORE:
AFTER:


Thursday, May 3, 2012

Time for a Chicken Coop (By: Jim)

Our son, Jason, moved off his farm land this month. He offered up his chickens and equipment. We did not have a chicken coop, nor a place to put one, so I ordered one from a family who builds them for a living. As soon as I saw the coop, I realized it was in need of many modifications to work properly. It weighed about 400 Lbs. and could not be moved by two adults. I bought three wheelbarrow wheels and made a frame for them to to ride in. The four doors had no trim support, so I redesigned them to weather seal the side hen boxes. The side screen windows were open, so I made storm shutters for both sides. The chicken coop was roofed and weather sealed the day before the chickens were picked up. Jason gave us an automatic feeder and automatic watering cups, so the chickens are pretty-much maintenance free. He also gave us a solar light system, which causes the chickens to lay throughout the night. We are averaging 13 eggs a day from 18 chickens. The cost for feed is very low because the chickens are eating left over feed from the goats.

This picture shows the automatic feeder box to the left of the chicken coop. The black pole on the right side of the chicken house is a solar light system. We just started on our yearly garden. I will report on that next month. Between the Goat milk and meat, the Chicken eggs and meat, and the garden, We are EATING THE QUALITY OF FOOD THAT GOD INTENDED FOR US TO EAT, and our health is improving daily. The FDA should be ashamed of themselves for pushing chemically treated food and destroying the health of so many people.

Wednesday, October 19, 2011

My dad's lathe (by: Jim)


1940's oil can made in USA
Dad's name tag still on his tool box

1953 South Bend, Model A, machinist lathe: Needless to say, it has been many years since I have run a metal lathe. So many that it seems like memories of someone else’s life. Back in 1962, my Dad’s machine shop was doing a good deal of business, and the lathes in Dad’s shop were much bigger then this one. Dad bought this lathe years after he closed down the shop.

When Dad’s bypass surgery went bad, it was a shock to everyone. Dad had planned to be in the hospital only a few days. The shop was a mess, because Dad had unfinished projects he planned to complete after his surgery. Due to the poor medical service in San Luis Obispo County, the family spent the next seven years caring for Dad and dealing with the medical system. Dad’s shop was pretty much ignored. Tools were either rusting where they sat or disappearing one at a time. The lathe was cleaned a few times, but it still suffered from neglect. Every time I looked at that lathe, it brought back so many memories. Then, I noticed the rust, something Dad would have never allowed on his tools. When Dad passed away, I asked Mom for the lathe. Not that I needed a lathe, but I did not want to see it disappear and I did not want to see it neglected anymore.

I brought the lathe to Oregon in several pieces. There were several boxes of rusty calipers and attachments that had not been used in over thirty years. I recognized many of the tools from back in the sixties when the machine shop was going strong, but I had never seen them so dirty and rusty as they had become.

I built a table for the lathe. The top was made from antique 4x12’s from the 1950’s, and the frame from new 4x4’s. When I finished the top, my wife wanted to use it for a dinning table. Some people laughed at the fact that so much detail work was put into the table finish. It may have been foolish to spend that much time on it, but the work was my expression of how I felt about it, plus I wanted to show my mom that the very best care was given to Dad’s lathe.

Day by day, week-by-week, and month-by-month, I took the lathe apart. Each part was cleaned to bare metal, polished on a buffer and painted. Thanks to the Internet, I located parts list and diagrams to assemble the lathe back together. Surprisingly, there were a couple parts missing, but replacement parts were located. The drawings showed many parts to have leather washers. These washers dissolved years ago, and I could not find them anywhere. I then asked myself, “What would Dad do?” I went down to the Goodwill Store and I bought an old leather belt. You remember, the kinds that were really made out of genuine leather. Using metal washers as a pattern, I cut out the leather washers and they look like factory made items. All circular control wheels were polished out to look like chrome. The lathe was painted original gray, but I used orange for the trim instead of the original black.

Dad did not like polished out tools. He was very picky about tool maintenance, but being pretty was not one of his requirements. In fact, when Dad saw a pretty tool he said it was a sign of an owner who had too much time on his hand and screwed up priorities. I am sure if Dad saw his lathe now he would say it looked like something bought from Home Depot. The colors chosen were to match my other machines, which were bought at Home Depot. I spent four months on this project in honor of my Dad, but I polished it out for my mom. I wanted to be able to tell her. “Look Mom, perfectly taken care of, just like I promised.  


Sunday, October 16, 2011

Building An Adjustable Goat Stanchion (by: Jim)

We looked at several goat milking stands and we talked with several goat owners about how they came about choosing their stand(s). The information was very useful, but we had a special problem. We are raising two different sizes of goats. Our stanchion  needed to have an adjustable head lock, and the front needed to have an adjustable feeder. None of the commercial stanchions  provided these qualities, and all of the commercial stanchions were ridiculous in cost.

With the help of local breeders, I came up with the approximate size. I made our stand a little taller then most, so Jean would not have to bend down when milking, or trimming the goats hooves. The pictures below show how the feeder is adjustable by pulling the Oak pins on each side and moving the feeder to a higher, or lower slot. I chose Oak for the pins, because the Pine pins kept flying apart on the lathe when I was turning them.

ADJUSTABLE HEAD LOCK: I made a metal locking device and attached it to the handle of the headboard. I then cut slots in the cross-member for the lock to fit in. I cut a slot every inch to accommodate all sizes of goats. Once again, the Pine was a failure. The cross-member broke out between the slots every time I put pressure on the headlock board. I replaced the cross-member with a Hard-rock Maple board and the slots were as solid as steal.

This project was sanded with fine 320 sandpaper, and all edges were rounded off for safety of the animal and the owner. Hopefully, these pictures will give other owners new ideas of how to build a completely adjustable Goat Stanchion. This is just one way to do it. With the help of other Goat Breeders, I am sure this stand can be improved on. The important issue is that we all provide input to help one another.


Monday, October 10, 2011

OUR GOAT BARN ( by: Jim)

GOAT BARN: When you only have a little over one acre, you have to plan out every new development. The main Goat barn was no exception. Goats like to drag their bodies along a fence line, so the fence had to be secured on top and bottom. With limited resources, I decided to use the woodshed for the stable. It is directly across from our side door and away from neighbors. There is easy access and a clear view from the house to watch for predators. The woodshed was only a roof held up by four fir tree posts. I made a frame for the siding. Home Depot wanted too much for their siding, so I made a deal with a family who runs a one-man Ceder mill. He cut me seventy 1X6 boards 6 feet long. They are truly one inch thick and six inches wide. Jean and I set the fence post and strung out the fencing. We then stapled the fence every six inches to top rails and bottom rails. We stapled the siding to the walls and put in an automatic watering system. After adding a few extras, like a bench for the goats and a window to access the feeding bins, we had a new goat barn.